Showing posts with label Home Decor. Show all posts

9.23.2016

GUEST POST - Make an Easy Rustic Halloween Garland with Painted Pinecones

Make an Easy Rustic Halloween Garland with Painted PineconesHey guys. Hope you had a wonderful week. Just two months for Halloween and have you started preparing for it? If you want some quick and easy idea to decorate your home this Halloween, then follow along cause Victoria, our Guest Blogger today is going to share with you guys an awesome and super easy DIY Halloween home decor project. I am so happy to have her on-board. Thank you for sharing such a beautiful project with Craftadise readers, Victoria. :) Now, without wasting much time, let's see what Victoria has to share with all of us. Over to Victoria.


Hi! I’m Victoria from Dazzle While Frazzled. I’m happy to be here today on Craftadise sharing with you how to create an easy rustic Halloween garland using painted pinecones. Grab the kids and head outside to scour the yard (or maybe the neighbor’s!) for our main crafting supply – pinecones.

Once they are cleaned (soaked in a water-vinegar bath for 30 minutes followed by baking at 200° for 30 minutes), grab your craft brush and paints to create a quick and easy hand-painted touch of Halloween.

9.12.2016

5 things I do everyday to keep my home clean and organized + free daily / weekly cleaning checklist

Being a blogger and a solopreneur, might sometimes makes things difficult for me. I get caught up with crochet orders, updating my blog, planning new things or ideas, cleaning my home, cooking and a lot more. I guess you all might relate to this exact scenario. Handling a blog, your business and a home sounds difficult. But believe me, for those still finding this a tedious task, we are definitely meant for more and can handle multiple tasks in a clear and organized fashion. We've got this girls. We are born with this talent of multi-tasking and it only needs to be implemented and perfected.

One way I keep my home clean is by taking a set of tasks and doing it everyday, so that I don't find myself in a clutter by the end of the week and doubling my time for cleaning and household activities. Doing this saves me so much time and effort and I can concentrate on my blogging and business as well.

5 things I do everyday to keep my home clean and organized + free daily / weekly cleaning checklist


So lets see what 5 things I do everyday to keep my Home clean (and maybe next week, I will post on the things I do everyday to organize and plan my business and blogging activities, the entrepreneur side of me).

4.12.2016

Free sewing pattern: Fabric Coasters


Free sewing pattern: Fabric Coasters


It's been quite long since I posted a sewing project. This was perfect since I received an order on the same from my friend. I wanted to post on this as it took me approximately less than 2 hours to complete the entire project from cutting the fabric to finishing. It is a great project for beginners learning to sew straight lines and great for ones who want something new and fresh looking for their tables when guests arrive :) So here's a super easy Fabric Coaster pattern. 

4.05.2016

Colour with Asian Paints : Revisit

Who doesn't love the beauty of colors, the freshness it gives and the smile that it brings to our face? Who doesn't love to keep updating ourselves with the color we most love to our everyday environment and who doesn't love to experiment the hidden treasure from its unique patterns? 

If your answer to all of the above mentioned questions is YES YES and YES !!! :) then please continue reading more on what ASIAN PAINTS has brought to us this season. 


9.16.2015

Quick and Cheap: Curtain Setup

Furniture and curtains play a vital role in home decor. I just love them. Change their type or style them up, and there, you have a totally different look for the season or party. Oh, and not to mention, Cushion covers as well. :) 

I have a simple and quick and most cheap way to put up your curtains. It is so easy and I did it myself, so yeah, you can definitely do it. (Not kidding ... )  


You don't need much for this. Just gather the below materials and you are ready to go...

6.15.2015

10 Brilliant Hacks for an Organized and Clean Home (with everyday items)

Life is so complicated and managing and maintaining dual life can be even harder. In a way or two, everyone seems to be playing double roles in their respective lives. A work-at home mom --> handling her business and her family; a man --> handling his job and his family; and even kids --> their schoolwork and games :) and the list continues...

In this life full of twists and turns, gadgets and materials, we come across so many wonderful inventions that ease our life and make life simpler and better. Out of these, few that we use in our daily basis, serves this purpose rightly. This is what is explained in this post, how few everyday items that we use come in handy to do the toughest of jobs and bring a smile on our face when it's job is accomplished.

10 Brilliant Hacks for an Organized and Clean Home (with everyday items)

Few that I have mentioned below can be used to make our daily activities simpler and cleaner. 


1. Tooth brush

"I am the magic wand", says the little toothbrush. Its purpose is to clean our teeth and to reach every nook & corner of it and remove dirt and keep it bright and neat. It's purpose doesn't end here. 

10 Brilliant Hacks for an Organized and Clean Home (with everyday items)
[Image source]

Lets see a few where it can be used once it serves its main purpose. 
  • To clean bottle covers and neck
  • To apply hair dye evenly
  • As a mascara
  • To remove dirt from the keyboard
  • To clean chains or other instruments
  • As a mixing tool
  • To clean a comb
  • To remove stains from baseboards, switch plates, tile, etc.
  • As a paint brush
  • To clean grills
  • and many more.......


2. Toothpick

Toothpick also serves more than what it was intended to do. Lets have a look at a few:

10 Brilliant Hacks for an Organized and Clean Home (with everyday items)
[Image source]

  • To reach reset buttons and on/off it
  • To clean rings and earrings
  • For nail painting and others
  • Clean cracks
  • Remove dirt from the sides of phone
  • For cupcake toppers
  • Tiny craft garland
  • As a mixing tool
  • To apply tiny sequins and pearl stickers
  • As a bookmark
  • For tiny craft flags
  • To steer icing to the desired shape
  • Sandwich breads/burgers together
  • For chocolate marshmallows
  • To pick up fruits and eat
  • etc.


3. Old Newspaper

10 Brilliant Hacks for an Organized and Clean Home (with everyday items)
[Image source]

  • Wrapping notebooks and text books
  • Gift wrapping
  • Place this down first, then cut vegetables. Wrap the paper up along with waste and throw it. This keeps your table tops/ kitchen tops clean all time.
  • Similarly, place this while eating and to keep utensils.
  • To cut sample shapes while sewing or other craft work
  • To fill bags and boxes while gifting them 
  • To pack freshly ironed clothes and to keep them in wardrobe
  • etc.


4. Waste cloth / dress

I know many of them would definitely have scrap clothes of old clothes lying around taking up space in your wardrobe. Every few months or atleast a year, clean your closets and wardrobe, take the clothes that you haven't used for many months, keep them aside. From that, keep the ones that are good for Donation and other scraps for other purposes. Few of which are mentioned below:


10 Brilliant Hacks for an Organized and Clean Home (with everyday items)
[Image source]


  • To clean countertops
  • To clean appliances
  • To clean floor and dust baseboards
  • To wipe utensils
  • Can be made into a rug
  • Can make garland
  • Clean laptop and other electronic devices
  • To mop floors


5. Cardboard


10 Brilliant Hacks for an Organized and Clean Home (with everyday items)
[Image source]

  • To make craft or school projects
  • Pom-pom maker tool
  • To make base shape for sewing projects
  • Packaging, etc


6. Boxes / bottles
10 Brilliant Hacks for an Organized and Clean Home (with everyday items)
[Image source]

  1. Shoe boxes or other cardboard boxes for:
  • organizing scarfs, yarn, craft supplies, etc.
  • organizing packed food / supplies
  • gift boxes
  • etc.
     
     2. Bottles
  • as vase
  • planters
  • top half as a funnel
  • bottle caps to make round shapes
  • bottle caps as paint container
  • to make bracelets
  • can be used as water filter
  • to store dry spices
  • etc.


7. Old notebook


If you have notebooks that have already been used and just lying around your home, do not throw them away. We'll see how these can be used in different ways.

10 Brilliant Hacks for an Organized and Clean Home (with everyday items)
[Image source]
  • Collect blank pages from similar sized books and bind them together for a brand new book.
  • Use pages can be used as scrap for designing or making sample shapes for sewing and other projects
  • They can be used to wrap some brand new stuff to give it a fresh look and free from dust 
  • Use hard bound notebook covers as Ipad sleeves with a extra touches and craftiness.
  • These covers can in-turn be used as book covers for your newly bound pages
  • These can be applied for use as Household Binder, Meal planner, Blog planner, etc.
  • and a lot more...


8. Yarn scrap

10 Brilliant Hacks for an Organized and Clean Home (with everyday items)
[Image source]

  • Scrap yarns can be used for gift wrapping
  • Collectively to make a rug / crochet hat or any project {mug cozy, coasters, etc.)
  • Can be used to make dishcloths or washcloths.
  • etc.


9. Ear buds


10 Brilliant Hacks for an Organized and Clean Home (with everyday items)
[Image source]

  • For painting purpose.
  • To make small polka dots 
  • To clean keyboard and monitor corners
  • To clean sills and grills.
  • To clean slider space of windows and showcase
  • etc.


10. Pens/pencil

10 Brilliant Hacks for an Organized and Clean Home (with everyday items)
[Image source]

  • To make shapes in painting
  • To reach reset button
  • etc.

Similarly, several objects can be used apart from what they are intended to be. For example, binder clips, paper clips, toilet paper rolls, etc.

It is upto us to analyze the item after its use and before it is into the trash. Keep the ones that will help you and throw the rest, otherwise it'l just pile up into a big garbage. 

Hope this was useful and do share your experience with these. Do you have any other idea with these objects? How often do you use them?


I am participating in the ‘Ready For Rewards’ activity for Rewardme in association with BlogAdda.


4.13.2015

Free crochet pattern: Nesting bowls

I love organizing my home and work space and find little things than can be upcylcled and used as storage containers or dividers, etc. Here is a crochet pattern that can be used to organize stuff in your work desk like pins, eraser, etc.  and even in your dresser for hair pins, clips, etc.

Free crochet pattern: Nesting bowls


These crochet Nesting Bowls are so easy to make. You can make them in different sizes, yarn and color. Its all your choice.

Materials Required: 
  • White, Magenta, Peach and Lavendar color yarn (I used Laura Knitting Cotton)
  • 4 mm Crochet Hook
  • Tapestry Needle (to sew the ends)


Abbreviations:
  • ch- chain
  • sc- single crochet
  • hdc- half double crochet
  • ss- slip stitch


Size:
  • Small -  1.5" Height, 2.5" Diameter
  • Medium - 2" Height, 3" Diameter
  • Large - 2.5" Height, 4" Diameter

Free crochet pattern: Nesting bowls


Pattern:

NOTE: Chain 2 in the beginning of rounds is not considered as HDC

SMALL: 

{With lavender color yarn}

Round 1: Ch 4. Join with 1st chain made to form a ring.
Round 2: Ch 2. 1 HDC in the same stitch and 1 HDC in every stitch around. SS with 1st HDC. [8]
Round 3: Ch 2. 1 HDC in the same stitch, 2 HDC in the next stitch. *(1 HDC in the next, 2 HDC in the next)* rep from *to* till end. SS with 1st HDC. [16]
Round 4: Ch 2. 1 HDC in the same stitch, 1 HDC in the next stitch, 2 HDC in the next stitch, *(1 HDC in the next 2 stitches, 2 HDC in the next)* rep from *to* till end. SS with 1st HDC. [24]
Round 5: Ch 2. 1 HDC in the same stitch, 1 HDC in the next 2 stitches, 2 HDC in the next stitch, *(1 HDC in the next 3 stitches, 2 HDC in the next)* rep from *to* till end. SS with 1st HDC. [32]
Round 6: Ch 2. {In Back loops only} 1 HDC in the same stitch and 1 HDC in every stitch around. SS with 1st HDC. [32]

Round 7 and 8: Ch 2. {In Both loops} 1 HDC in the same stitch and 1 HDC in every stitch around. SS with 1st HDC. [32]

{With white color yarn}
 
Round 9:  Ch 2. {In Both loops} 1 HDC in the same stitch and 1 HDC in every stitch around. SS with 1st HDC. [32]
Fasten  off and weave the ends.


Free crochet pattern: Nesting bowls


MEDIUM:

{With magenta color yarn}

Round 1: Ch 4. Join with 1st chain made to form a ring.
Round 2: Ch 2. 1 HDC in the same stitch and 1 HDC in every stitch around. SS with 1st HDC. [8]
Round 3: Ch 2. 1 HDC in the same stitch, 2 HDC in the next stitch. *(1 HDC in the next, 2 HDC in the next)* rep from *to* till end. SS with 1st HDC. [16]
Round 4: Ch 2. 1 HDC in the same stitch, 1 HDC in the next stitch, 2 HDC in the next stitch, *(1 HDC in the next 2 stitches, 2 HDC in the next)* rep from *to* till end. SS with 1st HDC. [24]
Round 5: Ch 2. 1 HDC in the same stitch, 1 HDC in the next 2 stitches, 2 HDC in the next stitch, *(1 HDC in the next 3 stitches, 2 HDC in the next)* rep from *to* till end. SS with 1st HDC. [32]
Round 6: Ch 2. 1 HDC in the same stitch, 1 HDC in the next 3 stitches, 2 HDC in the next stitch, *(1 HDC in the next 4 stitches, 2 HDC in the next)* rep from *to* till end. SS with 1st HDC. [40]
Round 7: Ch 2. {In Back loops only} 1 HDC in the same stitch and 1 HDC in every stitch around. SS with 1st HDC. [40]

Round 8,9 and 10: Ch 2. {In Both loops} 1 HDC in the same stitch and 1 HDC in every stitch around. SS with 1st HDC. [40]

{With white color yarn}
  
Round 11 and 12:  Ch 2. {In Both loops} 1 HDC in the same stitch and 1 HDC in every stitch around. SS with 1st HDC. [40]
Fasten  off and weave the ends.

Free crochet pattern: Nesting bowls

 LARGE:

{With peach color yarn}

Round 1: Ch 4. Join with 1st chain made to form a ring.
Round 2: Ch 2. 1 HDC in the same stitch and 1 HDC in every stitch around. SS with 1st HDC. [8]
Round 3: Ch 2. 1 HDC in the same stitch, 2 HDC in the next stitch. *(1 HDC in the next, 2 HDC in the next)* rep from *to* till end. SS with 1st HDC. [16]
Round 4: Ch 2. 1 HDC in the same stitch, 1 HDC in the next stitch, 2 HDC in the next stitch, *(1 HDC in the next 2 stitches, 2 HDC in the next)* rep from *to* till end. SS with 1st HDC. [24]
Round 5: Ch 2. 1 HDC in the same stitch, 1 HDC in the next 2 stitches, 2 HDC in the next stitch, *(1 HDC in the next 3 stitches, 2 HDC in the next)* rep from *to* till end. SS with 1st HDC. [32]
Round 6: Ch 2. 1 HDC in the same stitch, 1 HDC in the next 3 stitches, 2 HDC in the next stitch, *(1 HDC in the next 4 stitches, 2 HDC in the next)* rep from *to* till end. SS with 1st HDC. [40]
Round 7: Ch 2. 1 HDC in the same stitch, 1 HDC in the next 4 stitches, 2 HDC in the next stitch, *(1 HDC in the next 5 stitches, 2 HDC in the next)* rep from *to* till end. SS with 1st HDC. [48]
Round 8: Ch 2. {In Back loops only} 1 HDC in the same stitch and 1 HDC in every stitch around. SS with 1st HDC. [48]

Round 9, 10, 11 and 12: Ch 2. {In Both loops} 1 HDC in the same stitch and 1 HDC in every stitch around. SS with 1st HDC. [48]

{With white color yarn}
 
Round 13, 14 and 15:  Ch 2. {In Both loops} 1 HDC in the same stitch and 1 HDC in every stitch around. SS with 1st HDC. [48]
Fasten  off and weave the ends.

Free crochet pattern: Nesting bowls

Now that you have your nesting bowls, you can easily store them when not in use and have a fun and colorful desk organizer. Make them in whatever size and color you want to match your room or space.

Did you like these? Do you have any other crochet organizer project? Please share with us.


2.12.2015

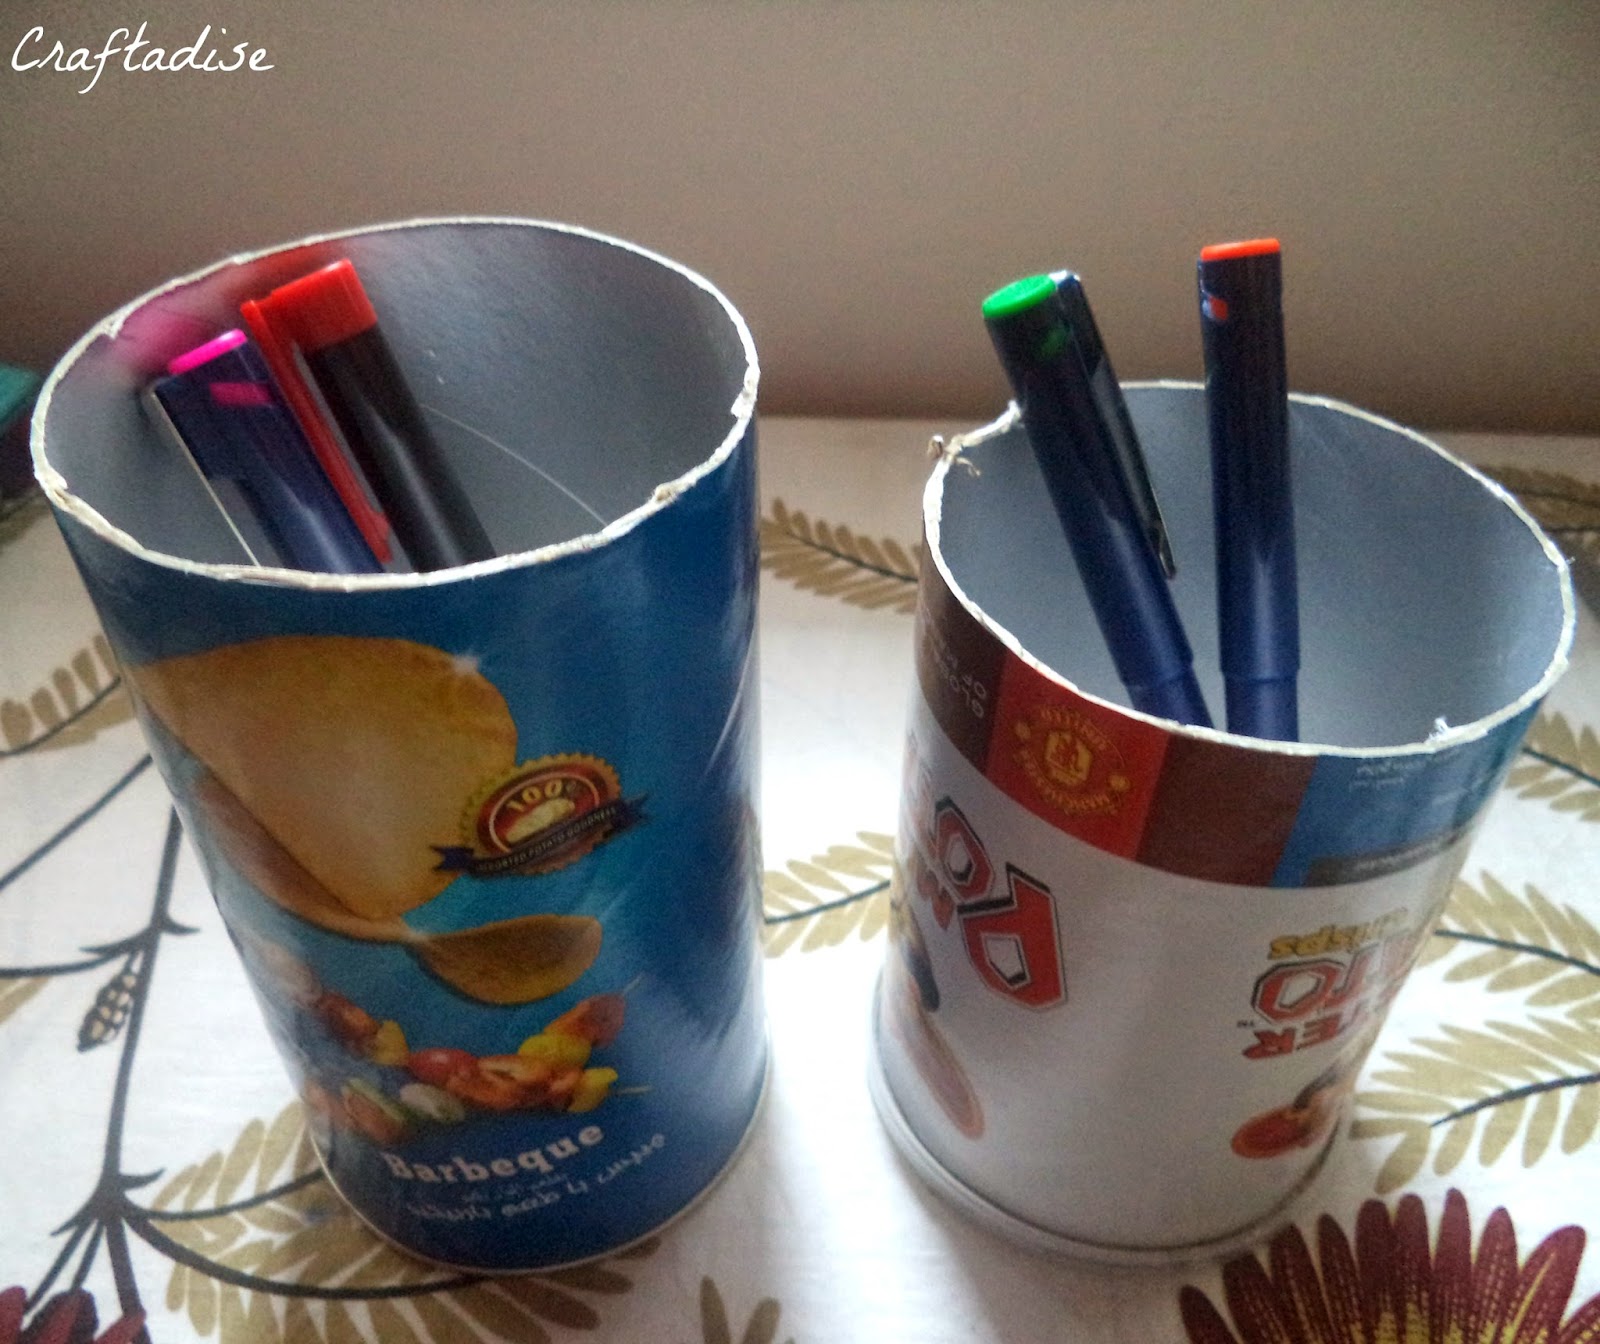
DIY: Mister Potato Crisps or Pringles Box turned Pencil and Crochet Hooks Stand

I have been finding many Mister Potato Crisps box at home. Thanks to my brother :) I do not have the heart to throw it as the box is so sturdy and can be used in several ways for storage and other DIY projects :) 

Last time when I got my hands on them, I turned this box into a lovely storage box to store my paper scraps in progress. You can find the tutorial here.

As I have been putting up my workspace, I wanted something for my desk where I spend my entire day. This is what I have come up with this time. :)

A simple DIY project to turn this lovely cardboard box to twin desk organizer :) How lovely? 


DIY: Mister Potato Crisps or Pringles Box turned Pencil and Crochet Hooks Stand


Materials Required:

  1. Blade/Knife {user friendly one - and be very careful white using it}
  2. Scissors
  3. Mister Potato Crips Box
  4. Self Adhesive Pattern paper {or any pattern paper and glue}


DIY: Mister Potato Crisps or Pringles Box turned Pencil and Crochet Hooks Stand

Procedure:
  • Cut the box into half or any desired length you want the stand to be. I cut it on the line as shown on the picture below.

DIY: Mister Potato Crisps or Pringles Box turned Pencil and Crochet Hooks Stand
  • Then place the two in line with each other. Place the items you want to in them and check for the height.

DIY: Mister Potato Crisps or Pringles Box turned Pencil and Crochet Hooks Stand
  • I wanted one for pens and the other for crochet hooks.

DIY: Mister Potato Crisps or Pringles Box turned Pencil and Crochet Hooks Stand
  • Carefully trim the excess by marking the point to cut.
DIY: Mister Potato Crisps or Pringles Box turned Pencil and Crochet Hooks Stand

DIY: Mister Potato Crisps or Pringles Box turned Pencil and Crochet Hooks Stand
  • Now you will have two stands. One with actual base and the other with the lid.
  • Wrap it with the pattern paper and you are ready to use.
DIY: Mister Potato Crisps or Pringles Box turned Pencil and Crochet Hooks Stand
  • I have used one to hold my planner pens, color pencils and fine tip marker pens; and the other to hold my crochet hooks, scissors and measuring tape. 

DIY: Mister Potato Crisps or Pringles Box turned Pencil and Crochet Hooks Stand

A simple and useful DIY project that anyone can try. I've made mine with no money at all and have made my desk beautiful with these gorgeous twin desk organizers :) 

I hope you like it. :) Please share your projects with these boxes in the comment below. Have fun creating these twin-beauties for your desk!!!

Happy crafting :)


1.27.2015

Home décor - Simple wall décor using Emboss Painting

A quick and easy wall decor project. Emboss Painting is so easy and adds a beautiful touch to your plain walls. My aunt purchased one long back in 2005 [Image 1]. She also asked me to paint thereby encouraging me :) It was the first ever Emboss painting kit we purchased.


Home décor - Simple wall décor using Emboss Painting

HOW TO USE:

  • Open the kit. 
  • Take the cloth with the painting.
  • Iron the cloth in medium heat upside down.
  • The painting area will now become raised due to application of heat.
  • Paint in anyway you like or using the given color pattern with the kit.
[Usually the kit comes with small paint bottles].

Later I purchased one myself and painted it. This time I used Glitter Glue on the border of every flower and also the pot [Image 2].


It is so easy to do and you don't have to draw the design yourself. Since the design gets embossed it is easy to paint as well. You can purchase them from your local craft store or online. 

An easy way to decorate your home. Do try it :)


1.21.2015

Yarn Storage: Organizing and Storing Cotton Yarn in a Cardboard Box

I've been crocheting a lot lately. I have been receiving orders and some experiments to complete. I am also working on new patterns as I want to move a step further. During this process of learning, creating and experimenting, I got a huge collection of yarn (well, I still need more ;) ) 

In one of my previous post, I showed how to turn an old cardboard box to a storage box. I also used one of them to store my yarns (a part of it. It has now tripled, Yippeee !!! ). You can find the how-to here and how I used the boxes here.

I have certain yarns smaller in size (50g each) that are 100% cotton. {Laura Knitting Cotton} that I purchased from Pony Craft Store. You can purchase them online as well. Now that I have a few of them, I was thinking of a separate storage for them since I do not want them to be mixed with other bigger yarns. This is what I ended up with. A simple, cute and colorful Cotton Yarn Storage.

Yarn Storage: Organizing and Storing Cotton Yarn in a Cardboard Box


On my visit to Doha during November, I purchased a beautiful looking storage box from Daiso. Pink obviously attracted me. I got this one for something else, but I ended up storing my colorful yarns in it. This is how it looks like. Cute, isn't it??? :) 

It has a label holder in front, a cute polka dot lid and a pink striped base. 

Organizing and Storing Cotton Yarn in a Cardboard Box
[Front View]

It also has 'Special fantasy' written on its side. :)

Organizing and Storing Cotton Yarn in a Cardboard Box
[Side view]

Another view of the box and that is my Daily Planner Ring Binder on the table. You can find the post about it here.

[Another side view]

I have arranged my yarns neatly based on colors {Whites, creams, yellows, pinks, green, brown,...}
Now I have a little more of them :)

Organizing and Storing Cotton Yarn in a Cardboard Box
[My yarns neatly organized]

To make use of the label holder, I cut a small piece of paper to fit the holder and wrote 'Crochet Cotton Yarn' and placed it inside the holder. You can either print and cut the label. 

Organizing and Storing Cotton Yarn in a Cardboard Box
[Label Holder]

If you do not have a box, you can make one yourself and wrap it up using your favourite pattern paper. 

You can find a round-up of how cardboard boxes are used for storage solution here.

I am very happy with my storage box since it looks cute on the outside and colorful on the inside :) Simple and easy way to organize your yarn.

Do you have any other idea of yarn storage? Please share them on the comments below. Share how you store your yarn.


12.05.2014

Home decor - Wall decor using Long stitch kit : Floral design

This is a small post on home decor.

Simply beautify your wall with this little Anchor 'Long Stitch' design... I chose floral pattern and filled with shades of pink and yellow. I finally framed it and now its happy to be placed in my room. It totally matches my space :)


Home decor - Wall decor using Long stitch kit : Floral design


You can find one in your local craft stores. You can also buy them in online stores.


Buy your kit now (Anchor Long-Stitch Kit) and try. Its so easy and beautiful :)