Showing posts with label Paper Craft. Show all posts

9.06.2016

Card Making: Floral Card using Layered Stamp + Single Color Technique

My love for florals will never come to fade I guess. Looking at this post and the previous post you'll know why. :) 

Before I can get into this post, I would definitely like to mention few things. I was into card making before, but when I found my love for crochet along the way, I slightly leaned towards crochet and blogging and wasn't much into cards or paper crafts. While browsing one day, I found these amazing crafters posting their creations in groups and their pages on handmade cards and the use of clear stamps. I was totally new to the concept of clear stamps, but they looked so beautiful and attractive and most importantly, Perfect. This is when I started browsing for more of such things and started checking for online stores selling Clear Stamps. 

To my good fortune, one such company that make these clear stamps happened to participate in an Artisans Market in Chennai, and this is when I started planning my shopping list. A big shout out to Varshitha from Mudra Craft Stamps, an Indian based company that manufactures a vast variety of clear stamps that are gorgeous and yet affordable. She is such a humble and lovely human being and a crafter and she explained the technique so well, also Parul who assisted her. Thank you so much guys. :) I am really glad to have met you both.

I wanted to share with you guys, my first ever Floral Card using Stamping Technique using Ink Pads. It was really easy and fun to make this card and I loved it. Although I have quite a lot to learn, I am still happy with this first result of mine. :) 

Card Making: Floral Card using Layered Stamp + Single Color Technique


4.22.2016

DIY Earring / Hair Clip Display Card for Craft Fair

As promised earlier, I am here with one of the DIY Craft Fair Display ideas. This one is for earrings and hair clips. Instead of placing the earrings or clips on the table, why not make these display cards to make your work stand out and more visible to anyone who crosses your stall. This was the easiest of all the DIY display ideas that I made and it took less than an hour to complete around 20 such cards.

DIY Earring / Hair Clip Display Card for Craft Fair, craft fair display ideas


I had so many people coming to the stall just by looking at these. They were so interested on the display and they had an extra close look at it. And yeah, most of them were sold out as well. :) 

So without further ado; let's see how it is done.

9.01.2014

ROUND-UP : DIY Cardboard Boxes as Storage Boxes

I’ve been doing projects on cardboard boxes lately. Why waste them when you get loads of them. So basically what you do is to recycle these boxes which are going to be of no use and transform them into some lovely boxes to store your stuff and for many other craft purposes in turn making them useful. This helps you to make any type you want with any color and size according to your need. This way you can organize your room or space better and make it visually more appealing as well. All this is done with very less cost and based totally on your requirements.


As I said, you will need an empty cardboard box. Where do you get it from???? 

1.       Size à Big
·         Diaper boxes
·         Chocolate boxes
·         Biscuit boxes
·         Big parcel box
·         Etc.

2.       Size à medium
·         Shoe boxes
·         Cereal boxes
·         Tissue boxes
·         Etc.

3.       Size à small
·         Small biscuit boxes
·         Accessories box
·         Etc.


These can be used to store many items like:
  •     Toys
  •         Craft supplies
  •     Yarn 
  •     Books
  •     Magazines
  •     Papers
  •     Mats
  •     Packed goods in pantry
  •     Cords
  •         Hats

      and a lot more…….

There are a huge collection of products which come within a cardboard box. When you purchase them, be sure you collect it and use it accordingly. It might come handy someday.

I hadn’t collected them, but I ask my father for these as he has it in shop from box full of chocolates, biscuits, chips, beverages, etc. and also few from home like cereal boxes and shoe boxes. And ofcourse, tissue boxes. There will definitely be a lot of them lying around the house.  My habit is to keep all these things together instead of throwing them away.

So here is a collection of how these cardboard boxes can be transformed to beautiful looking storage boxes and how they have helped in organizing the space and also for what purposes it can be used. The list is endless and so I have presented a few in this post.


[source]
Aimee has covered her box with burlap and attached a ruffle onto it.


[source]
Jamie from ‘DIY home sweet home’ has used some old boxes covered with duct tape for storing toys.

Michelle from Iron and Twine transformed the boxes using utility fabric and upcycled leather belts that she bought from a thrift store.  She used it in her entryway to store and organize scarves, gloves and umbrellas.

 Karen from Sew many ways covered her cardboard box with fabric, attached handles to it along with labels. It makes a perfect organization tool in her craft room.


Lauren Weems from Brit co. covered the boxes with sturdy fabrics and added belts to it as a handle.

 Amy from Positively Splendid used a diaper box and beautified it with some fabric, ribbons and added labels to them using adhesive vinyl. How wonderful they look.


[source]
Amy from Home Happy Home has painted the box chevron style.

 Emily from Namely Original covered the boxes with fabric to store school supplies and for pantry organization.

 Ashley from Make it Love it has also covered the cardboard box with fabric to store craft supplies.

Jennifer Jones used fabric covered cardboard boxes to store toys. To make it easy for the kids to pull them she had attached string to it.

 Allonsy Kimberly used boxes to store fabrics.


[source]
 Liz made use of post office boxes and twine to make storage containers.


As said before, even shoe boxes, tissue boxes and cereal boxes can be recycled.

 Ribbon dispenser from shoe boxes.


[source]
Such beautiful containers made using shoe boxes, twine and button


[source]
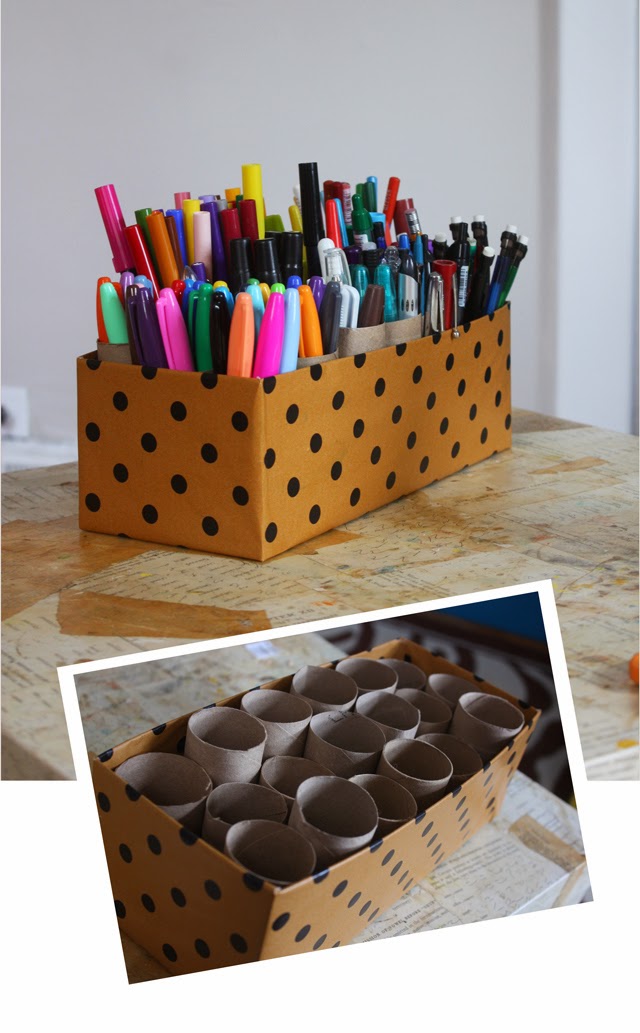
Peaches has used shoe box and toilet paper roll to hold stationary items.


[source]

[source]
Jennifer Jones from IHeartOrganizing has used a box with dividers and labels to hold cords. Such a good idea. She has also made use of cereal boxes as drawer dividers.


[source]
Toni from A bowl full of lemons has used cereal boxes covered up with pattern paper as magazine and paper holders.


[source]
Ingrid Talpak has shown how to make a storage box from a tissue box.

There are so many other ways you can decorate cardboard boxes and use them to store numerous things. Organize your space in a more beautiful way and in your favorite color to match your room. A great and inexpensive project. Try them. Think before you trash them away. 

Have a great day. :) 


8.29.2014

Cardboard Storage Box - Organizing and Storage solution - My way

Hello friends :) Okay. So last week I had shown you how I transformed a cardboard box to this amazing storage box. You can find how I did it here.

I had also promised you guys that I will be showing how I used them as my organizing solution. So this is how I used them to store two most important things for me. First, prayer rugs and then my crochet yarn. Well, there is a lot more of that yarn, I have actually stored the excess here. This gives me an idea of another blog post on how to organize crochet yarn and how I did it. Later on that. 


So I printed out these amazing labels online and wrote the purpose of each using a marker pen. I attached the labels onto the box using double-sided sticker (3D) to give a raised effect.


And here is a look at my excess yarn storage box and they peacefully rest while their off duty and off hooks :)


I used these boxes and placed them on a shelf so they look matching and neatly organized without a mess.


Do share your projects as well. I would love to see them. Take care :)


8.25.2014

DIY : Vanity tray from an old tissue box

Hello there. Hope you have enjoyed the lovely weekend. I had spent my weekend trying on some crochet projects for babies and I am glad that I have completed a part of it. Will definitely post the results when I am done with it. 

Let me share with you a very simple, inexpensive and a quick project. All you ladies out there. This one is specially for you... 

Ta da.... Today's project is a Vanity Tray.


You might wonder what a vanity tray is. Well let me explain you. It is something decorative made out of silver or gold or plastic or any container to hold your perfume bottles.

Well, I have gone a step further and added a lot more than a perfume bottle. Pretty handy though. All what you need for the day is right in front of you and sits right there without making a mess on your dresser (unless you have some meddling kids around the house [wink wink] ).


I made my version of a vanity tray using an old tissue box. I trimmed the upper portion for a small tray with shorter border for it and to prevent any item within from falling. Then I quickly wrapped it up with some cute pink shaded polka dot pattern paper to see how beautiful its gonna turn out. I also added a piece of self adhesive pattern paper on the base so that the actual tissue box base isn't visible and also for easy cleaning purpose

And my version of vanity tray is all set and ready to use.


I hope you liked it. If you are making one, please do share it. I would love to see your work.


10.14.2013

Birthday Lace Card

This is a Birthday handmade card. The base is pearlized pink card-stock. Then I added Brown scalloped edged card onto the base and glued Lace trims on the sides of it. Finally, I attached a two layer label card-stock. 


Layers:
  • Pearlized brown card-stock with scalloped edges
  • White lace trim
  • Label card-stock (pink and brown)
Embellishments:
  • Lace trim itself
  • 3D flower stickers
  • White pearls
  • Label card-stock
Also, I have added in border details using glitter gel.

I hope you liked it. Happy crafting everyone and craft with love :)


10.12.2013

Thank You Card

Shades of Pink handmade card :)


Layers:
  • Scallop edged card-stock
  • Roses pattern card
  • Banner card-stock - shades of dark pink, light pink and white
  • Label card-stock - shades of light pink and white
Embellishments:
  • Light pink satin ribbon
  • White peals
  • Label cut card-stock
  • Flowers


10.09.2013

Card - A lovely heart

A lovely card for your special person. Make this beautiful card and gift your loved ones :)

Materials:
  • Heart scallop from white chart paper
  • Heart shaped card from red chart paper
  • Scissors
  • Glue
  • Pearl Stickers
  • Pattern paper
  • Ribbon
  • Glitter pen
Instructions:
  • Cut the heart scallop and heart card as shown above. 


  • Stick the card onto the scallop as shown below.


  • I used glitter pen to decorate the card border


  • Glue a pattern paper (heart shape - slightly smaller than the size of the card) onto the card and decorate it using pearl stickers.


  • Finally, cut out small heart shapes using red and white chart and stick them together. Embellish it with glitter pen, ribbons and pearls.


  • Fill in your words and there you have it. A beautiful heart-shaped card :)